
Site Map
Latest Release
- Please cite: Langmead B, Hansen K, Leek J. Cloud-scale RNA-sequencing differential expression analysis with Myrna. Genome Biology 11:R83.
- For release updates, subscribe to the mailing list.
| Myrna 1.2.3 | 10/17/13 |
|
|
|
|
|
|
Related Tools
Reference jars
| H. sapiens GRCh37/Ensembl 67 |
|
s3://genome-idx/myrna/myrna-refs/human_ensembl_67.jar s3://genome-idx/myrna/myrna-refs//human_ensembl_67.cs.jar (color) |
| M. musculus NCBIM37/Ensembl 67 |
|
s3://genome-idx/myrna/myrna-refs/mouse_ensembl_67.jar s3://genome-idx/myrna/myrna-refs/mouse_ensembl_67.cs.jar (color) |
| P. troglodytes v2.1/Ensembl 67 |
|
s3://genome-idx/myrna/myrna-refs/chimp_ensembl_67.jar s3://genome-idx/myrna/myrna-refs/chimp_ensembl_67.cs.jar (color) |
| M. mulatta v1/Ensembl 67 |
|
s3://genome-idx/myrna/myrna-refs/rhesus_ensembl_67.jar s3://genome-idx/myrna/myrna-refs/rhesus_ensembl_67.cs.jar (color) |
| R. norvegicus RGSC3.4/Ensembl 67 |
|
s3://genome-idx/myrna/myrna-refs/rat_ensembl_67.jar s3://genome-idx/myrna/myrna-refs/rat_ensembl_67.cs.jar (color) |
| G. gallus WASHUC2/Ensembl 67 |
|
s3://genome-idx/myrna/myrna-refs/chicken_ensembl_67.jar s3://genome-idx/myrna/myrna-refs/chicken_ensembl_67.cs.jar (color) |
| C. familiaris BROADD2/Ensembl 67 |
|
s3://genome-idx/myrna/myrna-refs/dog_ensembl_67.jar s3://genome-idx/myrna/myrna-refs/dog_ensembl_67.cs.jar (color) |
| D. melanogaster BDGP5.13/Ensembl 67 |
|
s3://genome-idx/myrna/myrna-refs/fly_ensembl_67.jar s3://genome-idx/myrna/myrna-refs/fly_ensembl_67.cs.jar (color) |
| C. elegans WS210/Ensembl 67 |
|
s3://genome-idx/myrna/myrna-refs/worm_ensembl_67.jar s3://genome-idx/myrna/myrna-refs/worm_ensembl_67.cs.jar (color) |
| S. cerevisiae v1.01/Ensembl 67 |
|
s3://genome-idx/myrna/myrna-refs/yeast_ensembl_67.jar s3://genome-idx/myrna/myrna-refs/yeast_ensembl_67.cs.jar (color) |
Related publications
- Langmead B, Hansen K, Leek J. Cloud-scale RNA-sequencing differential expression analysis with Myrna. Genome Biology 11:R83.
- Schatz M, Langmead B, Salzberg SL. Cloud computing and the DNA data race. Nature Biotechnology 2010 Jul;28(7):691-3.
- Langmead B, Schatz M, Lin J, Pop M, Salzberg SL. Searching for SNPs with cloud computing. Genome Biology 10:R134.
- Langmead B, Trapnell C, Pop M, Salzberg SL. Ultrafast and memory-efficient alignment of short DNA sequences to the human genome. Genome Biology 10:R25.
Authors
Links
Table of Contents
Version 1.2.3
- What is Myrna?
- A word of caution
- Myrna modes and prerequisites
- Preparing to run on Amazon Elastic MapReduce
- Installing Myrna
- Running Myrna
- Running Myrna on EMR via the web interface
- Running Myrna on EMR via the command line
- Running Myrna on a Hadoop cluster via the command line
- Running Myrna on a single computer via the command line
- General Myrna options
- Myrna examples
- Labeled manifest files
- Reference jars
- Monitoring, debugging and logging
- Myrna output
- Other reading
- Acknowledgements
What is Myrna?
Myrna is a scalable, portable, automatic tool for calculating differential gene expression in large RNA-seq datasets. Myrna employs Bowtie for alignment and R/Bioconductor for assigning alignments to genes, normalizing gene counts, calculating differential-expression statistics, and plotting the results. Myrna is designed to be easy to run (a) in "the cloud" (in this case, Amazon's Elastic MapReduce service), (b) on any Hadoop cluster, or (c) on any single computer, without needing Hadoop. Myrna exploits the availability of multiple computers and processors where possible.
A word of caution
Renting resources from Amazon Web Services (AKA AWS), costs money, regardless of whether your experiment ultimately succeeds or fails. In some cases, Myrna or its documentation may be partially to blame for a failed experiment. While we are happy to accept bug reports, we do not accept responsibility for financial damage caused by these errors. Myrna is provided "as is" with no warranty. See LICENSE file.
Myrna modes and prerequisites
Myrna can be run in four different ways.
- Via the Myrna web interface
In this case, the Myrna code and the user interface are installed on EC2 web servers. Also, the computers running the Myrna computation are rented from Amazon, and the user must have EC2, EMR, S3 and SimpleDB accounts and must pay the going rate for the resources used. The user does not need any special software besides a web browser and, in most cases, an S3 tool.
- On Amazon Elastic MapReduce via the command-line
In this case, the Myrna code is hosted by Amazon and the computers running the Myrna computation are rented from Amazon. However, the user must install and run (a) the Myrna scripts, which require Perl 5.6 or later, (b) Amazon's elastic-mapreduce script, which requires Ruby 1.8 or later, and (c) an S3 tool. The user must have EC2, EMR, S3 and SimpleDB accounts and must pay the going rate for the resources used.
- On a Hadoop cluster via the command-line
In this case, the Myrna code is hosted on your Hadoop cluster, as are the supporting tools: Bowtie, R/Bioconductor and possibly the SRA Toolkit. Supporting tools must be installed on all cluster nodes, but the Myrna scripts need only be installed on the master. Myrna was tested with Hadoop versions 0.20 and 0.20.205, and might also be compatible with other versions newer than 0.20. Myrna scripts require Perl 5.6 or later.
- On any computer via the command-line
In this case, the Myrna code and all supporting tools (Bowtie and R/Bioconductor, and possibly the SRA Toolkit) must be installed on the computer running Myrna. The Myrna scripts require Perl 5.6 or later to run. The user specifies the maximum number of CPUs that Myrna should use at a time. This mode does not require Java or Hadoop.
Preparing to run on Amazon Elastic MapReduce
Before running Myrna on EMR, you must have an AWS account with the appropriate features enabled. You may also need to install Amazon's elastic-mapreduce tool. In addition, you may want to install an S3 tool, though most users can simply use Amazon's web interface for S3, which requires no installation.
If you plan to run Myrna exclusively on a single computer or on a Hadoop cluster, you can skip this section.
Create an AWS account by navigating to the AWS page. Click "Sign Up Now" in the upper right-hand corner and follow the instructions. You will be asked to accept the AWS Customer Agreement.
Sign up for EC2 and S3. Navigate to the Amazon EC2 page, click on "Sign Up For Amazon EC2" and follow the instructions. This step requires you to enter credit card information. Once this is complete, your AWS account will be permitted to use EC2 and S3, which are required.
Sign up for EMR. Navigate to the Elastic MapReduce page, click on "Sign up for Elastic MapReduce" and follow the instructions. Once this is complete, your AWS account will be permitted to use EMR, which is required.
Sign up for SimpleDB. With SimpleDB enabled, you have the option of using the AWS Console's Job Flow Debugging feature. This is a convenient way to monitor your job's progress and diagnose errors.
Optional: Request an increase to your instance limit. By default, Amazon allows you to allocate EC2 clusters with up to 20 instances (virtual computers). To be permitted to work with more instances, fill in the form on the Request to Increase page. You may have to speak to an Amazon representative and/or wait several business days before your request is granted.
To see a list of AWS services you've already signed up for, see your Account Activity page. If "Amazon Elastic Compute Cloud", "Amazon Simple Storage Service", "Amazon Elastic MapReduce" and "Amazon SimpleDB" all appear there, you are ready to proceed.
Be sure to make a note of the various numbers and names associated with your accounts, especially your Access Key ID, Secret Access Key, and your EC2 key pair name. You will have to refer to these and other account details in the future.
Installing Amazon's elastic-mapreduce tool
Read this section if you plan to run on Elastic MapReduce via the command-line tool. Skip this section if you are not using EMR or if you plan to run exclusively via the Myrna web interface.
To install Amazon's elastic-mapreduce tool, follow the instructions in Amazon Elastic MapReduce developer's guide for How to Download and Install Ruby and the Command Line Interface. That document describes:
Installing an appropriate version of Ruby, if necessary.
Setting up an EC2 keypair, if necessary.
Setting up a credentials file, which is used by the
elastic-mapreducetool for authentication.
For convenience, we suggest you name the credentials file credentials.json and place it in the same directory with the elastic-mapreduce script. Otherwise you will have to specify the credential file path with the --credentials option each time you run myrna_emr.
We strongly recommend using a version of the elastic-mapreduce Ruby script released on or after December 8, 2011. This is when the script switched to using Hadoop v0.20.205 by default, which is the preferred way of running Myrna.
We also recommend that you add the directory containing the elastic-mapreduce tool to your PATH. This allows Myrna to locate it automatically. Alternately, you can specify the path to the elastic-mapreduce tool via the --emr-script option when running myrna_emr.
S3 tools
Running on EMR requires exchanging files via the cloud-based S3 filesystem. S3 is organized as a collection of S3 buckets in a global namespace. S3 charges are incurred when transferring data to and from S3 (but transfers between EC2 and S3 are free), and a per-GB-per-month charge applies when data is stored in S3 over time.
To transfer files to and from S3, use an S3 tool. Amazon's AWS Console has an S3 tab that provides a friendly web-based interface to S3, and doesn't require any software installation. s3cmd is a very good command-line tool that requires Python 2.4 or later. S3Fox Organizer is another GUI tool that works as a Firefox extension. Other tools include Cyberduck (for Mac OS 10.6 or later) and Bucket Explorer (for Mac, Windows or Linux, but commercial software).
Installing Myrna
Myrna consists of a set of Perl and shell scripts, plus supporting tools: Bowtie and R/Bioconductor . If you plan to run Myrna via the Myrna web interface exclusively, there is nothing to install. Otherwise:
Download the desired version of Myrna, from the sourceforge site
Set the
MYRNA_HOMEenvironment variable to point to the extracted directory (containingmyrna_emr)If you plan to run on a local computer or Hadoop cluster:
If using Linux or Mac OS 10.6 or later, you likely don't have to install Bowtie as Myrna comes with pre-built versions for those platforms. Test this by running:
$MYRNA_HOME/myrna_local --testIf the
Summary:section containsbowtie: INSTALLED at /some/path, Bowtie installation is complete. Otherwise, obtain or build abowtiebinary v0.12.8 or higher from the Bowtie web site and install it by setting theMYRNA_BOWTIE_HOMEenvironment variable to the directory containing thebowtieexecutable. Alternately, add the enclosing directory to yourPATHor specify its location via the--bowtieoption when running Myrna scripts.If the install test indicates that R is not installed, see Installing R and Bioconductor. To confirm your installation is complete, re-run:
$MYRNA_HOME/myrna_local --testIf you plan to run on a Hadoop cluster, you may need to manually copy the
bowtieexecutable, the R install directory, and thefastq-dumptool to the same path on each Hadoop cluster node. You can avoid this step by installingbowtie, R/Bioconductor, andfastq-dumpon a filesystem shared by all Hadoop nodes (e.g. an NFS share). You can also skip this step if Hadoop is installed in pseudo distributed mode, meaning that the cluster really consists of one node whose CPUs are treated as distinct slaves.
Installing R and Bioconductor
To run Myrna on a Hadoop cluster or local computer, R 3.0.1 and Bioconductor must be installed along with all packages required by Myrna. If you already have R v3.0.1, Bioconductor and all appropriate packages but Myrna can't find where they're installed, set the MYRNA_RHOME environment variable to point the appropriate R home directory, i.e., the directory containing bin/R and bin/Rscript executables for the proper installation.
If you do not already have an R v3.0.1/Bioconductor installation, try the instructions in either or both of the following sections, Building R/Bioconductor automatically or Manually installing R/Bioconductor.
Building R/Bioconductor automatically
The Myrna package includes a bash script that builds R 3.0.1 from sources and installs Bioconductor and all required packages automatically:
cd $MYRNA_HOME/R ; ./build_rThis script will:
- Download R v3.0.1 and expand it to subdirectory
R-3.0.1 - Run R's
./configurescript - Run
make - Install R packages
multicoreandlmtest - Install Bioconductor and packages
IRanges,geneplotter,biomaRt,Biostrings
When the script completes, the $MYRNA_HOME/R directory contains the R/Bioconductor installation. Myrna looks in this location by default, so no further steps are necessary for Myrna to find it. To test this, run:
$MYRNA_HOME/myrna_local --testor:
$MYRNA_HOME/myrna_hadoop --testIf you see the output R: INSTALLED with RHOME at /some/path, then Myrna will find and use your R/Bioconductor instalaltion.
Note: you can override Myrna's default of using the installation in $MYRNA_HOME/R by specifying the --Rhome option or setting the MYRNA_RHOME environment variable.
Manually installing R/Bioconductor
To install R version 3.0.1, follow the instructions in the R Installation and Administration guide. If you plan to run in Hadoop mode, make sure that R is installed on all nodes, including the master. To avoid copying, you might wish to install R on a shared filesystem visible to all Hadoop nodes, such as an NFS share.
To complete installation, install the following additional packages if necessary:
The
lmtestpackage. Install with:/path/to/Rscript -e 'install.packages("lmtest", repos="http://cran.r-project.org")'The
multicorepackage. Install with:/path/to/Rscript -e 'install.packages("multicore", repos="http://cran.r-project.org")'
The following Bioconductor packages are also required:
The base Bioconductor packages. Install with:
/path/to/Rscript -e 'source("http://bioconductor.org/biocLite.R"); biocLite()'The
IRangespackage. Install with:/path/to/Rscript -e 'source("http://bioconductor.org/biocLite.R"); biocLite("IRanges")'The
biomaRtpackage. Install with:/path/to/Rscript -e 'source("http://bioconductor.org/biocLite.R"); biocLite("biomaRt")'The
geneplotterpackage. Install with:/path/to/Rscript -e 'source("http://bioconductor.org/biocLite.R"); biocLite("geneplotter")'The
Biostringspackage. Install with:/path/to/Rscript -e 'source("http://bioconductor.org/biocLite.R"); biocLite("Biostrings")'
The SRA toolkit
The Sequence Read Archive (SRA) is a resource at the National Center for Biotechnology Information (NCBI) for storing sequence data from modern sequencing instruments. Sequence data underlying many studies, including very large studies, can often be downloaded from this archive.
The SRA uses a special file format to store archived read data. These files end in extensions .sra, and they can be specified as inputs to Myrna's preprocessing step in exactly the same way as FASTQ files.
However, if you plan to use .sra files as input to Myrna in either Hadoop mode or in single-computer mode, you must first install the SRA toolkit. Once the toolkit is installed, be aware of where it placed the fastq-dump binary program. See the SRA toolkit page for details about how to download and install. We recommend installing the pre-compiled binaries rather than trying to build the SRA toolkit from source.
When searching for the fastq-dump tool at runtime, Myrna searches the following places in order:
- The path specified in the
--fastq-dumpoption - The directory specified in the
MYRNA_FASTQ_DUMP_HOMEenvironment variable - The system
PATH
Running Myrna
The commands for invoking Myrna from the command line are:
$MYRNA_HOME/myrna_emr (or just myrna_emr if $MYRNA_HOME is in the PATH) for running on EMR. See Running Myrna on EMR via the command line for details.
$MYRNA_HOME/myrna_hadoop (or just myrna_hadoop if $MYRNA_HOME is in the PATH) for running on Hadoop. See Running Myrna on a Hadoop cluster via the command line for details.
$MYRNA_HOME/myrna_local (or just myrna_local if $MYRNA_HOME is in the PATH) for running locally on a single computer, . See Running Myrna on a single computer via the command line for details.
Running Myrna on EMR via the web interface
Prerequisites
- Web browser
- EC2, S3, EMR, and SimpleDB accounts. To check which ones you've already enabled, visit your Account Activity page.
- A tool for browsing and exchanging files with S3
- The AWS Console's S3 tab is a good web-based tool that does not require software installation
- A good command line tool is s3cmd
- A good GUI tool is S3Fox Organizer, which is a Firefox Plugin
- Others include Cyberduck, Bucket Explorer
- Basic knowledge regarding:
- What S3 is, what an S3 bucket is, how to create one, how to upload a file to an S3 bucket from your computer (see your S3 tool's documentation).
- How much AWS resources will cost you
To run
If the input reads have not yet been preprocessed by Myrna (i.e. input is FASTQ or
.sra), then first (a) prepare a labeled manifest file with URLs pointing to the read files, and (b) upload it to an S3 bucket that you own. See your S3 tool's documentation for how to create a bucket and upload a file to it. The URL for the labeled manifest file will be the input URL for your EMR job.If the input reads have already been preprocessed by Myrna, make a note of the S3 URL where they're located. This will be the input URL for your EMR job.
If you are using a pre-built reference jar, make a note of its S3 URL. This will be the reference URL for your EMR job. See the Myrna website for a list of pre-built reference jars and their URLs.
If you are not using a pre-built reference jar, you may need to build the reference jars and/or upload them to an S3 bucket you own. See your S3 tool's documentation for how to create a bucket and upload to it. The URL for the main reference jar will be the reference URL for your EMR job.
In a web browser, go to the Myrna web interface
Fill in the form according to your job's parameters. We recommend filling in and validating the "AWS ID" and "AWS Secret Key" fields first. Also, when entering S3 URLs (e.g. "Input URL" and "Output URL"), we recommend validating the entered URLs by clicking the link below it. This avoids failed jobs due to simple URL issues (e.g. non-existence of the "Input URL"). For examples of how to fill in this form, see the Yeast EMR and Human EMR examples.
Running Myrna on EMR via the command line
Prerequisites
- EC2, S3, EMR, and SimpleDB accounts. To check which ones you've already enabled, visit your Account Activity page.
- A tool for browsing and exchanging files with S3
- The AWS Console's S3 tab is a good web-based tool that does not require software installation
- A good command line tool is s3cmd
- A good GUI tool is S3Fox Organizer, which is a Firefox Plugin
- Others include Cyberduck, Bucket Explorer
- Basic knowledge regarding:
- What S3 is, what an S3 bucket is, how to create one, how to upload a file to an S3 bucket from your computer (see your S3 tool's documentation).
- How much AWS resources will cost you
To run
If the input reads have not yet been preprocessed by Myrna (i.e. input is FASTQ or
.sra), then first (a) prepare a labeled manifest file with URLs pointing to the read files, and (b) upload it to an S3 bucket that you own. See your S3 tool's documentation for how to create a bucket and upload a file to it. The URL for the labeled manifest file will be the input URL for your EMR job.If the input reads have already been preprocessed by Myrna, make a note of the S3 URL where they're located. This will be the input URL for your EMR job.
If you are using a pre-built reference jar, make a note of its S3 URL. This will be the reference URL for your EMR job. See the Myrna website for a list of pre-built reference jars and their URLs.
If you are not using a pre-built reference jar, you may need to build the reference jars and/or upload them to an S3 bucket you own. See your S3 tool's documentation for how to create a bucket and upload to it. The URL for the main reference jar will be the reference URL for your EMR job.
Run
$MYRNA_HOME/myrna_emrwith the desired options. Options that are unique to EMR jobs are described in the following section. Options that apply to all running modes are described in the General Myrna options section. For examples of how to run$MYRNA_HOME/myrna_emrsee the Yeast EMR and Human EMR examples.
EMR-specific options
|
S3 URL where the Myrna reference jar is located. URLs for pre-built reference jars for some commonly studied species (including human, chimpanzee, rhesus monkey, mouse, rat and yeast) are available from the Myrna web site. Note that a Myrna reference jar is not the same as a Crossbow reference jar. If your desired genome and/or gene annotations are not available in pre-built form, you will have to make your own reference jar and upload it to one of your own S3 buckets (see Reference jars). This option must be specified. |
|
S3 URL where the input is located. If |
|
S3 URL where the output is to be deposited. If |
|
S3 URL where all intermediate results should be be deposited. By default, intermediate results are stored in HDFS and disappear once the cluster is terminated. |
|
S3 URL where the preprocessed reads should be stored. This can be useful if you later want to run Myrna on the same input reads without having to re-run the preprocessing step (i.e. leaving |
|
Local path to the credentials file set up by the user when the |
|
Local path to the |
|
Specify the name by which the job will be identified in the AWS Console. |
|
By default, EMR will terminate the cluster as soon as (a) one of the stages fails, or (b) the job complete successfully. Specify this option to force EMR to keep the cluster alive in either case. |
|
Specify the number of instances (i.e. virtual computers, also called nodes) to be allocated to your cluster. If set to 1, the 1 instance will funcion as both Hadoop master and slave node. If set greater than 1, one instance will function as a Hadoop master and the rest will function as Hadoop slaves. In general, the greater the value of |
|
Specify the type of EC2 instance to use for the computation. See Amazon's list of available instance types and be sure to specify the "API name" of the desired type (e.g. |
|
Pass the specified extra arguments to the |
|
Causes EMR to copy the log files to |
|
By default, Myrna causes EMR to copy all cluster log files to the |
|
Disables Job Flow Debugging. If this is not specified, you must have a SimpleDB account for Job Flow Debugging to work and you will be subject to additional SimpleDB-related charges; those fees are typically small or zero (depending on your account's SimpleDB tier). |
Running Myrna on a Hadoop cluster via the command line
Prerequisites
Working installation of Hadoop v0.20.2 or v0.20.205. Other versions newer than 0.20 might also work, but haven't been tested.
A
bowtiev0.12.8 executable must exist at the same path on all cluster nodes (including the master). That path must be specified via the--bowtieoption OR located in the directory specified in theMYRNA_BOWTIE_HOMEenvironment variable, OR in a subdirectory of$MYRNA_HOME/binOR in thePATH(Myrna looks in that order).$MYRNA_HOME/bincomes with pre-built Bowtie binaries for Linux and Mac OS X 10.6 or later; an executable from that directory is used automatically unless the platform is not Mac or Linux or unless overridden by--bowtieor by definingMYRNA_BOWTIE_HOME.R/Bioconductor v3.0.1 or later must be installed at the same path on all cluster nodes (including the master). The R home directory (containing
bin/Randbin/Rscript) must be specified via the--Rhomeoption OR specified in theMYRNA_RHOMEenvironment variable, OR must exist in the$MYRNA_HOME/Rdirectory ORRscriptmust be found in thePATH(Myrna searches in that order). The$MYRNA_HOME/Rdirectory contains a script (build_r) that can be used to build an appropriate R/Bioconductor installation in the$MYRNA_HOME/Rdirectory. See sections on automatically building R/Bioconductor and packages required by Myrna.If any of your inputs are in Sequence Read Archive format (i.e. end in
.sra), then thefastq-dumptool from the SRA Toolkit must be installed at the same path on all cluster nodes. The path to thefastq-dumptool must be specified via the (--fastq-dump) option ORfastq-dumpmust be located in the directory specified in theMYRNA_FASTQ_DUMP_HOMEenvironment variable, ORfastq-dumpmust be found in thePATH(Myrna searches in that order).Sufficient memory must be available on all Hadoop slave nodes to hold the Bowtie index for the desired organism in addition to any other loads placed on those nodes by Hadoop or other programs. For mammalian genomes such as the human genome, this typically means that slave nodes must have at least 5-6 GB of RAM.
To run
Run $MYRNA_HOME/myrna_hadoop with the desired options. Options that are unique to Hadoop jobs are described in the following subsection. Options that apply to all running modes are described in the General Myrna options subsection. To see example invocations of $MYRNA_HOME/myrna_hadoop see the Yeast Hadoop and Human Hadoop examples.
Hadoop-specific options
|
HDFS URL where the reference jar is located. Pre-built reference jars for some commonly studied species (including human and mouse) are available from the Myrna web site; these can be downloaded and installed in HDFS using |
|
HDFS URL where the input is located. If |
|
HDFS URL where the output is to be deposited. If |
|
HDFS URL where all intermediate results should be be deposited. Default: |
|
HDFS URL where the preprocessed reads should be stored. This can be useful if you later want to run Myrna on the same input reads without having to re-run the preprocessing step (i.e. leaving |
|
Path to the Bowtie executable to use when running the Align step. The executable must be (a) runnable, and (b) located at the same path on all Hadoop nodes, or the job will fail. This overrides all other ways that Myrna searches for |
|
Path to the |
|
Path to the R home directory for the R/Bioconductor installation to be used by Myrna. The home directory is the one containing |
Running Myrna on a single computer via the command line
Prerequisites
A
bowtiev0.12.8 executable must exist on the local computer. The path tobowtiemust be specified via the--bowtieoption OR be located in the directory specified in the$MYRNA_BOWTIE_HOMEenvironment variable, OR in a subdirectory of$MYRNA_HOME/binOR in thePATH(search proceeds in that order).$MYTNA_HOME/bincomes with pre-built Bowtie binaries for Linux and Mac OS X 10.6 or later, so most Mac and Linux users do not need to install either tool.An installation of R/Bioconductor v3.0.1 or later must exist on the local computer, with all required packages installed. The R home directory (containing
bin/Randbin/Rscript) must be specified via the--Rhomeoption OR specified in the$MYRNA_RHOMEenvironment variable, OR must exist in the$MYRNA_HOME/Rdirectory ORRscriptmust be found in thePATH(Myrna searches in that order). The$MYRNA_HOME/Rdirectory contains a script (build_r) that can be used to build an appropriate R/Bioconductor installation in the$MYRNA_HOME/Rdirectory. See sections on automatically building R/Bioconductor and packages required by Myrna.If any of your inputs are in Sequence Read Archive format (i.e. end in
.sra), then thefastq-dumptool from the SRA Toolkit must be installed on the local computer. The path to thefastq-dumptool must be specified via the (--fastq-dump) option ORfastq-dumpmust be located in the directory specified in theMYRNA_FASTQ_DUMP_HOMEenvironment variable, ORfastq-dumpmust be found in thePATH(Myrna searches in that order).Sufficient memory must be available on the local computer to hold one copy of the Bowtie index for the desired organism in addition to all other running workloads. For mammalian genomes such as the human genome, this typically means that the local computer must have at least 5-6 GB of RAM.
To run
Run $MYRNA_HOME/myrna_local with the desired options. Options unique to local jobs are described in the following subsection. Options that apply to all running modes are described in the General Myrna options subsection. To see example invocations of $MYRNA_HOME/myrna_local see the Yeast local and Human local examples.
Local-run-specific options
|
Local path where expanded reference jar is located. Specified path should have a |
|
Local path where the input is located. If |
|
Local path where the output is to be deposited. If |
|
Local path where all intermediate results should be kept temporarily (or permanently, if |
|
Local path to the Bowtie binary Myrna should use. By default, Myrna searches the |
|
Keep intermediate directories and files, i.e. the output from all stages prior to the final stage. By default these files are deleted as soon as possible. |
|
Keep all temporary files generated during the process of binning and sorting data records and moving them from stage to stage, as well as all intermediate results. By default these files are deleted as soon as possible. |
|
The maximum number of processors to use at any given time during the job. Crossbow will try to make maximal use of the processors allocated. Default: 1. |
|
Maximum number of records to be dispatched to the sort routine at one time when sorting bins before each reduce step. For each child process, this number is effectively divided by the number of CPUs used ( |
|
Maximum number of files that can be opened at once by the sort routine when sorting bins before each reduce step. For each child process, this number is effectively divided by the number of CPUs used ( |
|
Path to the Bowtie executable to use when running the Align step. This overrides all other ways that Myrna searches for |
|
Path to the |
|
Path to the R home directory for the R/Bioconductor installation to be used by Myrna. The home directory is the one containing |
General Myrna options
The following options can be specified regardless of what mode (EMR, Hadoop or single-computer) Myrna is run in.
|
Treat all input reads as having the specified quality encoding. |
|
The input path or URL refers to a labeled manifest file rather than a directory of preprocessed reads. The first step in the Myrna computation will be to preprocess the reads listed in the labeled manifest file and store the preprocessed reads in the intermediate directory or in the |
|
The input path or URL refers to a labeled manifest file rather than a directory of preprocessed reads. Myrna will preprocess the reads listed in the labeled manifest file and store the preprocessed reads in the |
|
Instead of running the Myrna pipeline all the way through to the end, run the pipeline up to and including the align stage and store the results in the |
|
Resume the Myrna pipeline from just after the alignment stage. The |
|
Pass the specified arguments to Bowtie for the Align stage. Default: |
|
Randomly discard a fraction of the input reads. E.g. specify |
|
A read's "influence" is the number of bases from the 3' end (or the 5' end if |
|
If specified, a read's "influence" is measured from its 3' end after all trimming. This is the default. See also: |
|
If specified, a read's "influence" is measured from its 5' end after all trimming. Default: influence is measured from the 3' end. See also: |
|
If specified, a read's "influence" is measured from the middle of the read, after all trimming. Default: influence is measured from 3' end. See also: |
|
Myrna will report alignments and coverage plots for the "top" |
|
Type of statistical test used to determine a measure of differential expression for a gene. If |
|
Each count (or pooled count) is "normalized" according to a per-label baseline normalization factor. If Default: |
|
Set the gene footprint used when calculating overlaps between alignments and genes. See |
|
If specified, it is assumed that (a) the user's input labels must be divided into two groups, and (b) biological replicates must be "matched" between the groups. When this option is used, the statistical test used will take the pairing into account. |
|
Set the number of null statistics generated per gene to |
|
Truncate all reads down to a length of |
|
Truncate all reads down to a length of |
|
Suppress alignments and pileup plots from Myrna output. Differentially expressed genes, their p-values, and associated plots are still reported. |
|
For paired-end reads, discard mate |
|
Pool all replicates before calculating statistics. E.g. if the initial labels are A-1-1, A-1-2, A-2-1, A-2-2, B-1-1, B-1-2, B-2-1, B-2-2 (i.e. two groups, each with two biological replicates, each with two technical replicates), specifying this option will cause them to be pooled (gene counts are totaled) into A and B prior to calculation of normalization factors and statistics. |
|
Pool all technical replicates before calculating statistics. E.g. if the initial labels are A-1-1, A-1-2, A-2-1, A-2-2, B-1-1, B-1-2, B-2-1, B-2-2 (i.e. two groups, each with two biological replicates, each with two technical replicates), specifying this option will cause them to be pooled (gene counts are totaled) into A-1, A-2, B-1, and B-2 prior to calculation of normalization factors and statistics. |
| |
|
Instead of running Myrna, just search for the supporting tools (Bowtie, R/Bioconductor, and |
|
Local directory where temporary files (e.g. dynamically generated scripts) should be deposited. Default: |
Myrna examples
The following subsections guide you step-by-step through examples included with the Myrna package. Because reads (and sometimes reference jars) must be obtained over the Internet, running these examples requires an active Internet connection.
Yeast (small)
Data for this example is taken from the study by Lee, Hansen, Bullard et al.
EMR
Via web interface
Identify an S3 bucket to hold the job's input and output. You may need to create an S3 bucket for this purpose. See your S3 tool's documentation.
Use an S3 tool to upload $MYRNA_HOME/example/yeast/small.manifest to the example/yeast subdirectory in your bucket. You can do so with this s3cmd command:
s3cmd put $MYRNA_HOME/example/yeast/small.manifest s3://<YOUR-BUCKET>/example/yeast/To start the EMR job, start a new Myrna job via the AWS console and fill in the form as follows:

Myrna web form filled in for the small Yeast example.
- For AWS ID, enter your AWS Access Key ID
- For AWS Secret Key, enter your AWS Secret Access Key
- Optional: For AWS Keypair name, enter the name of your AWS keypair. This is only necessary if you would like to be able to ssh into the EMR cluster while it runs.
- Optional: Check that the AWS ID and Secret Key entered are valid by clicking the "Check credentials..." link
- For Job name, enter
Myrna-Yeast - Make sure that Job type is set to "Myrna"
- For Input URL, enter
s3://<YOUR-BUCKET>/example/yeast/small.manifest, substituting for<YOUR-BUCKET> - Optional: Check that the Input URL exists by clicking the "Check that input URL exists..." link
- For Output URL, enter
s3://<YOUR-BUCKET>/example/yeast/output_small, substituting for<YOUR-BUCKET> - Optional: Check that the Output URL does not exist by clicking the "Check that output URL doesn't exist..." link
- For Input type, select "Manifest file"
- For Quality encoding, select "Solexa+64"
- For Genome/Annotation, select "Yeast"
- For # EC2 instances, enter 5
- Click Submit
This job typically takes about 45 minutes on 5 c1.xlarge EC2 nodes. See Monitoring your EMR jobs for information on how to track job progress. To download the results, use an S3 tool to retrieve the contents of the s3://<YOUR-BUCKET>/example/yeast/output_small directory.
Via command line
Test your Myrna installation by running:
$MYRNA_HOME/myrna_emr --testThis will warn you if any supporting tools (elastic-mapreduce in this case) cannot be located or run.
Identify an S3 bucket to hold the job's input and output. You may need to create an S3 bucket for this purpose. See your S3 tool's documentation.
Use your S3 tool to upload $MYRNA_HOME/example/yeast/small.manifest to the example/yeast subdirectory in your bucket. You can do so with this s3cmd command:
s3cmd put $MYRNA_HOME/example/yeast/small.manifest s3://<YOUR-BUCKET>/example/yeast/Start the EMR job with the following command (substituting for <YOUR-BUCKET>):
$MYRNA_HOME/myrna_emr \
    --name "Myrna-Yeast" \
    --preprocess \
    --input=s3://<YOUR-BUCKET>/example/yeast/small.manifest \
    --output=s3://<YOUR-BUCKET>/example/yeast/output_small \
    --reference=s3://genome-idx/myrna/myrna-refs/yeast_ensembl_67.jar \
    --quality solexa64 \
    --instances 5
The --reference option instructs Myrna to use a pre-built reference jar at URL s3://genome-idx/myrna/myrna-refs/yeast_ensembl_67.jar. The --preprocess option instructs Myrna to treat the input as a manifest file, rather than a directory of already-preprocessed reads. As the first stage of the pipeline, Myrna downloads files specified in the manifest file and preprocesses them into Myrna's read format. --output specifies where the final output is placed.
This job typically takes about 45 minutes on 5 c1.xlarge EC2 nodes. See Monitoring your EMR jobs for information on how to track job progress. To download the results, use an S3 tool to retrieve the contents of the s3://<YOUR-BUCKET>/example/yeast/output_small directory.
Hadoop
Log into the Hadoop master node and test your Myrna installation by running:
$MYRNA_HOME/myrna_hadoop --testThis will warn you if any of the supporting tools or packages are missing on the master. You must also ensure that the same tools are installed in the same paths on all slave nodes, and are runnable by the slaves.
Download yeast_ensembl_67.jar from the following URL:
http://genome-idx.s3.amazonaws.com/myrna/myrna-refs/yeast_ensembl_67.jarE.g. with this command:
wget http://genome-idx.s3.amazonaws.com/myrna/myrna-refs/yeast_ensembl_67.jarEquivalently, you can use an S3 tool to download the same file from this URL:
s3://genome-idx/myrna/myrna-refs/yeast_ensembl_67.jarE.g. with this s3cmd command:
s3cmd get s3://genome-idx/myrna/myrna-refs/yeast_ensembl_67.jarInstall yeast_ensembl_67.jar in HDFS (the Hadoop distributed filesystem) with the following commands. If the hadoop script is not in your PATH, either add it to your PATH (recommended) or specify the full path to the hadoop script in the following commands.
hadoop dfs -mkdir /myrna-refs
hadoop dfs -put yeast_ensembl_67.jar /myrna-refs/yeast_ensembl_67.jar
The first creates a directory in HDFS (you will see a warning message if the directory already exists) and the second copies the local jar files into that directory. In this example, we deposit the jars in the /myrna-refs directory, but any HDFS directory is fine.
Remove the local yeast_ensembl_67.jar file to save space. E.g.:
rm -f yeast_ensembl_67.jarNext install the labeled manifest file in HDFS:
hadoop dfs -mkdir /myrna/example/yeast
hadoop dfs -put $MYRNA_HOME/example/yeast/small.manifest /myrna/example/yeast/small.manifest
Now start the job by running:
$MYRNA_HOME/myrna_hadoop \
    --preprocess \
    --input=hdfs:///myrna/example/yeast/small.manifest \
    --output=hdfs:///myrna/example/yeast/output_small \
    --reference=hdfs:///myrna-refs/yeast_ensembl_67.jar \
    --quality solexa64
The --preprocess option instructs Myrna to treat the input as a manifest file. As the first stage of the pipeline, Myrna will download the files specified on each line of the manifest file and preprocess them into Myrna's read format. The --reference option specifies the location of the reference jar contents. The --output option specifies where the final output is placed.
Single computer
Test your Myrna installation by running:
$MYRNA_HOME/myrna_local --testThis will warn you if any supporting tools (bowtie, R in this case) cannot be located or run.
If you don't already have a MYRNA_REFS directory, choose one; it will be the default path Myrna searches for reference jars. Permanently set the MYRNA_REFS environment variable to the selected directory.
Create a subdirectory called $MYRNA_REFS/yeast_ensembl_67:
mkdir $MYRNA_REFS/yeast_ensembl_67Download yeast_ensembl_67.jar from http://genome-idx.s3.amazonaws.com/myrna/myrna-refs/yeast_ensembl_67.jar to the new directory, e.g., with this command:
wget -O $MYRNA_REFS/yeast_ensembl_67/yeast_ensembl_67.jar http://genome-idx.s3.amazonaws.com/myrna/myrna-refs/yeast_ensembl_67.jarEquivalently, you can use an S3 tool to download the same file from: s3://genome-idx/myrna/myrna-refs/yeast_ensembl_67.jar, e.g. with this s3cmd command:
s3cmd get s3://genome-idx/myrna/myrna-refs/yeast_ensembl_67.jar $MYRNA_REFS/yeast_ensembl_67/yeast_ensembl_67.jarChange to the new yeast directory and expand yeast_ensembl_67.jar using the command:
cd $MYRNA_REFS/yeast_ensembl_67 && unzip yeast_ensembl_67.jarNow you may remove yeast_ensembl_67.jar to save space:
rm -f $MYRNA_REFS/yeast_ensembl_67/yeast_ensembl_67.jarNow run Myrna. Change to the $MYRNA_HOME/example/yeast directory and start the job via the myrna_local script:
cd $MYRNA_HOME/example/yeast
$MYRNA_HOME/myrna_local \
    --input=$MYRNA_HOME/example/yeast/small.manifest \
    --preprocess \
    --reference=$MYRNA_REFS/yeast_ensembl_67 \
    --output=output_small \
    --quality solexa64 \
    --cpus=<CPUS>
Substitute the number of CPUs you'd like to use for <CPUS>.
The --preprocess option instructs Myrna to treat the input as a manifest file. As the first stage of the pipeline, Myrna will download the files specified on each line of the manifest file and "preprocess" them into a format understood by Myrna. The --reference option specifies the location of the reference jar contents. The --output option specifies where the final output is placed. The --cpus option enabled Myrna to use up to the specified number of CPUs at any given time.
Human (large)
Data for this example is taken from the study by Blekhman, Marioni et al.
EMR
Via web interface
First we build a reference jar for a human assembly and annotations using scripts included with Myrna. The script searches for a bowtie-build executable with the same rules Myrna uses to search for bowtie. See Installing Myrna for details. Because one of the steps executed by the script builds an index of the human genome, it should be run on a computer with plenty of memory (at least 4 gigabytes, preferably 6 or more).
Run the following commands:
cd $MYRNA_HOME/reftools
sh ./human_ensembl.sh
The human_ensembl.sh script will automatically:
- Download the FASTA sequence for human; the particular assembly and build downloaded depends on the current Ensembl version.
- Build an index from the sequence downloaded in step 1.
- Download gene annotations from Ensembl via
biomaRt. - Package the information in a
.jarfile$MYRNA_HOME/reftools/human/human_ensembl_67.jar
At the time of this writing, the scripts in the $MYRNA_HOME/reftools directory will only work if the current version of Ensembl is v67. If the Ensembl version changes, the user must edit the ENSEMBL_VER and ENSEMBL_PREFIX variables (at the top of the script) accordingly. This will be fixed in a future version.
Next, use an S3 tool to upload the human_ensembl_67.jar file to the myrna-refs subdirectory in your bucket. E.g. with this s3cmd command (substituting for <YOUR-BUCKET>):
s3cmd put $MYRNA_HOME/reftools/human/human_ensembl_67.jar s3://<YOUR-BUCKET>/myrna-refs/You may wish to remove the locally-generated reference jar files to save space. E.g.:
rm -rf $MYRNA_HOME/reftools/humanUse an S3 tool to upload $MYRNA_HOME/example/human/full.manifest to the example/human subdirectory in your bucket. E.g. with this s3cmd command:
s3cmd put $MYRNA_HOME/example/human/full.manifest s3://<YOUR-BUCKET>/example/human/Direct your web browser to the Myrna web interface and fill in the form as below (substituting for <YOUR-BUCKET>):

Myrna web form filled in for the large human example.
- For AWS ID, enter your AWS Access Key ID
- For AWS Secret Key, enter your AWS Secret Access Key
- Optional: For AWS Keypair name, enter the name of your AWS keypair. This is only necessary if you would like to be able to ssh into the EMR cluster while it runs.
- Optional: Check that the AWS ID and Secret Key entered are valid by clicking the "Check credentials..." link
- For Job name, enter
Myrna-Human - Make sure that Job type is set to "Myrna"
- For Input URL, enter
s3://<YOUR-BUCKET>/example/human/full.manifest, substituting for<YOUR-BUCKET> - Optional: Check that the Input URL exists by clicking the "Check that input URL exists..." link
- For Output URL, enter
s3://<YOUR-BUCKET>/example/human/output_full, substituting for<YOUR-BUCKET> - Optional: Check that the Output URL does not exist by clicking the "Check that output URL doesn't exist..." link
- For Input type, select "Manifest file"
- For Quality encoding, select "Phred+33"
- For Genome/Annotation, select "Human"
- For # EC2 instances, enter 9
- Click Submit
This job typically takes about 55 minutes on 9 c1.xlarge EC2 nodes. See Monitoring your EMR jobs for information on how to track job progress. To download the results, use an S3 tool to retrieve the contents of the s3://<YOUR-BUCKET>/example/human/output_full directory.
Via command line
First we build a reference jar for a human assembly and annotations using scripts included with Myrna. The script searches for a bowtie-build executable with the same rules Myrna uses to search for bowtie. See Installing Myrna for details. Because one of the steps executed by the script builds an index of the human genome, it should be run on a computer with plenty of memory (at least 4 gigabytes, preferably 6 or more).
Run the following commands:
cd $MYRNA_HOME/reftools
sh ./human_ensembl.sh
The human_ensembl.sh script will automatically:
- Download the FASTA sequence for human; the particular assembly and build downloaded depends on the current Ensembl version.
- Build an index from the sequence downloaded in step 1.
- Download gene annotations from Ensembl via
biomaRt. - Package the information in a
.jarfile$MYRNA_HOME/reftools/human/human_ensembl_67.jar
At the time of this writing, the scripts in the $MYRNA_HOME/reftools directory will only work if the current version of Ensembl is v67. If the Ensembl version changes, the user must edit the ENSEMBL_VER and ENSEMBL_PREFIX variables (at the top of the script) accordingly. This will be fixed in a future version.
Next, use an S3 tool to upload the human_ensembl_67.jar file to the myrna-refs subdirectory in your bucket. E.g. with this s3cmd command (substituting for <YOUR-BUCKET>):
s3cmd put $MYRNA_HOME/reftools/human/human_ensembl_67.jar s3://<YOUR-BUCKET>/myrna-refs/You may wish to remove the locally-generated reference jar files to save space. E.g.:
rm -rf $MYRNA_HOME/reftools/humanUse an S3 tool to upload $MYRNA_HOME/example/human/full.manifest to the example/human subdirectory in your bucket. E.g. with this s3cmd command:
s3cmd put $MYRNA_HOME/example/human/full.manifest s3://<YOUR-BUCKET>/example/human/To start the EMR job, run the following command (substituting for <YOUR-BUCKET>):
$MYRNA_HOME/myrna_emr \
    --name "Myrna-Human" \
    --preprocess \
    --input=s3://<YOUR-BUCKET>/example/human/full.manifest \
    --output=s3://<YOUR-BUCKET>/example/human/output_full \
    --reference=s3://<YOUR-BUCKET>/myrna-refs/human_ensembl_67.jar \
    --instances 9
This job typically takes about 55 minutes on 9 c1.xlarge EC2 nodes. See Monitoring your EMR jobs for information on how to track job progress. To download the results, use an S3 tool to retrieve the contents of the s3://<YOUR-BUCKET>/example/human/output_full directory.
Hadoop
First we build a reference jar for a human assembly and annotations using scripts included with Myrna. The script searches for a bowtie-build executable with the same rules Myrna uses to search for bowtie. See Installing Myrna for details. Because one of the steps executed by the script builds an index of the human genome, it should be run on a computer with plenty of memory (at least 4 gigabytes, preferably 6 or more).
Run the following commands:
cd $MYRNA_HOME/reftools
sh ./human_ensembl.sh
The human_ensembl.sh script will automatically:
- Download the FASTA sequence for human; the particular assembly and build downloaded depends on the current Ensembl version.
- Build an index from the sequence downloaded in step 1.
- Download gene annotations from Ensembl via
biomaRt. - Package the information in a
.jarfile$MYRNA_HOME/reftools/human/human_ensembl_67.jar
Note that, due chiefly to the amount of time it takes to build a Bowtie index for the human genome, this command usually takes several hours to complete.
At the time of this writing, the scripts in the $MYRNA_HOME/reftools directory will only work if the current version of Ensembl is v67. If the Ensembl version changes, the user must edit the ENSEMBL_VER and ENSEMBL_PREFIX variables (at the top of the script) accordingly. This will be fixed in a future version.
Next, use the hadoop script to put the human_ensembl_67.jar file in the myrna-refs HDFS directory:
hadoop dfs -mkdir /myrna-refs
hadoop dfs -put $MYRNA_HOME/reftools/human_ensembl_67/human_ensembl_67.jar /myrna-refs/human_ensembl_67.jar
The first command will yield a warning if the directory already exists; ignore this. In this example, we deposit the jars in the /myrna-refs directory, but any HDFS directory is fine.
You may wish to remove the locally-generated reference jar files to save space. E.g.:
rm -rf $MYRNA_HOME/reftools/humanNow install the labeled manifest file in HDFS:
hadoop dfs -mkdir /myrna/example/human
hadoop dfs -put $MYRNA_HOME/example/human/full.manifest /myrna/example/human/full.manifest
To start the Hadoop job, run the following command (substituting for <YOUR-BUCKET>):
$MYRNA_HOME/myrna_hadoop \
    --preprocess \
    --input=hdfs:///myrna/example/human/full.manifest \
    --output=hdfs:///myrna/example/human/output_full \
    --reference=hdfs:///myrna-refs/human_ensembl_67.jar
Single computer
First we build a reference jar for a human assembly and annotations using scripts included with Myrna. The script searches for a bowtie-build executable with the same rules Myrna uses to search for bowtie. See Installing Myrna for details. Because one of the steps executed by the script builds an index of the human genome, it should be run on a computer with plenty of memory (at least 4 gigabytes, preferably 6 or more).
Run the following commands:
cd $MYRNA_HOME/reftools
sh ./human_ensembl.sh
The human_ensembl.sh script will automatically:
- Download the FASTA sequence for human; the particular assembly and build downloaded depends on the current Ensembl version.
- Build an index from the sequence downloaded in step 1.
- Download gene annotations from Ensembl via
biomaRt. - Package the information in a
.jarfile$MYRNA_HOME/reftools/human/human_ensembl_67.jar
At the time of this writing, the scripts in the $MYRNA_HOME/reftools directory will only work if the current version of Ensembl is v67. If the Ensembl version changes, the user must edit the ENSEMBL_VER and ENSEMBL_PREFIX variables (at the top of the script) accordingly. This will be fixed in a future version.
Move the directory containing the new reference jar into the $MYRNA_REFS directory:
mv $MYRNA_HOME/reftools/human_ensembl_67 $MYRNA_REFS/Now change to the $MYRNA_HOME/example/human directory and run Myrna (substitute the number of CPUs you'd like to use for <CPUS>):
cd $MYRNA_HOME/example/human
$MYRNA_HOME/myrna_local \
    --input=$MYRNA_HOME/example/human/full.manifest \
    --preprocess \
    --reference=$MYRNA_REFS/human_ensembl_67 \
    --output=output_full \
    --cpus=<CPUS>
Labeled manifest files
A manifest file describes a set of FASTQ or .sra formatted input files that might be located:
A manifest file can contain any combination of URLs and local paths from these various types of sources.
FASTQ files can be gzip or bzip2-compressed (i.e. with .gz or .bz2 file extensions). If .sra files are specified in the manifest and Myrna is being run in single-computer or Hadoop modes, then the fastq-dump tool must be installed and Myrna must be able to locate it. See the --fastq-dump option and the SRA Toolkit section of the manual.
A labeled manifest file additionally describes the relationship between input files and "samples", i.e. the biological units that were sequenced.
Each line in the manifest file represents either one file, for unpaired input reads, or a pair of files, for paired input reads. For a set of unpaired input reads, the line is formatted:
<URL>(tab)<Optional MD5>(tab)<Sample label>And for paired reads, the line is formatted:
<URL 1>(tab)<Optional MD5 1>(tab)<URL 2>(tab)<Optional MD5 2>(tab)<Sample label>Specifying an MD5 for an input file is optional. If it is specified, Myrna will attempt to check the integrity of the file after downloading by comparing the observed MD5 to the user-provided MD5. To disable this checking, specify 0 in this field.
<Sample label> must be formatted as:
`<Group ID>-<BioRep ID>-<TechRep ID>`.<Group ID> identifies a group; this is the level at which differential expression is calculated. E.g., groups for a cancer experiment might be Tumor and Normal and groups for a tissue experiment might be Liver and Blood. <BioRep ID> identifies biological replicates. E.g., for a cancer experiment with samples from two individuals with cancer and two individuals without cancer, the <BioRep ID>s might be Subject1 and Subject2. <TechRep ID> identifies technical replicates. E.g., if each individual in the cancer experiment was sequenced on 3 lanes of a sequencing machine, the <TechRep ID>s might be Lane1, Lane2, Lane3. Putting it all together, the set of labels for a cancer project might be:
Tumor-Subject1-Lane1
Tumor-Subject1-Lane2
Tumor-Subject1-Lane3
Tumor-Subject2-Lane1
Tumor-Subject2-Lane2
Tumor-Subject2-Lane3
Normal-Subject1-Lane1
Normal-Subject1-Lane2
Normal-Subject1-Lane3
Normal-Subject2-Lane1
Normal-Subject2-Lane2
Normal-Subject2-Lane3
Manifest files may have comment lines, which must start with the hash (#) symbol, and blank lines. All such lines are ignored by Myrna.
For examples of manifest files, see the files ending in .manifest in the $MYRNA_HOME/example/yeast and $MYRNA_HOME/example/human directories.
Reference jars
All information about a reference sequence needed by Myrna is encapsulated in a "reference jar" file. A reference jar includes a Bowtie index of the reference sequence for the species, and a set of files encoding gene annotations for the species.
Reference jar format
A Myrna reference jar is organized as:
- An
indexsubdirectory containing the Bowtie index files for the reference sequences. - An
ivalssubdirectory containing all gene footprint information.
These two directories must be packaged together into a jar file <NAME>.jar containing both directories.
Interval directory format
The interval directory contains subdirectories named un and ui, corresponding to the union and union-intersection gene footprints (see --gene-footprint). Each contains a separate set of gene footprints for the whole genome. Which set is used at runtime is determined by how the user sets the --gene-footprint option.
Each interval file is a tab-delimited table with columns for:
- Chromosome name (must match the chromosome name in the index in the
indexdirectory) - Gene name
- 1-based start coordinate for gene footprint interval
- 1-based end coordinate for gene footprint interval (inclusive)
Example (from the pre-built yeast jar):
$ head yeast/ivals/ui/I.ivals
I   YAL001C 147596  151008
I   YAL001C 151099  151168
I   YAL002W 143709  147533
I   YAL003W 142176  142255
I   YAL003W 142622  143162
I   YAL005C 139505  140761
I   YAL005C 141410  141433
I   YAL007C 137700  138347
I   YAL008W 136916  137512
I   YAL009W 135856  136635
The ivals directory also contains a pair of files (genes.txt and exons.txt) summarizing all of the genes and exons that were considered when building the footprint intervals. The columns of exons.txt correspond to the following Ensembl database columns:
ensembl_gene_idensembl_transcript_idensembl_exon_idchromosome_nameexon_chrom_startexon_chrom_endis_constitutivegene_biotype
And there is a header line providing labels for the columns. Example (from the pre-built yeast jar):
$ head yeast/ivals/exons.txt
ensembl_gene_id ensembl_transcript_id   ensembl_exon_id chromosome_name\
    exon_chrom_start    exon_chrom_end  is_constitutive gene_biotype
YHR055C YHR055C YHR055C.1   VIII    214535  214720  1   protein_coding
YPR161C YPR161C YPR161C.1   XVI 864445  866418  1   protein_coding
YOL138C YOL138C YOL138C.1   XV  61325   65350   1   protein_coding
YDR395W YDR395W YDR395W.1   IV  1263316 1266150 1   protein_coding
YGR129W YGR129W YGR129W.1   VII 750405  751052  1   protein_coding
YPR165W YPR165W YPR165W.1   XVI 875364  875993  1   protein_coding
YPR098C YPR098C YPR098C.1   XVI 729480  729526  1   protein_coding
YPR098C YPR098C YPR098C.2   XVI 728945  729383  1   protein_coding
YPL015C YPL015C YPL015C.1   XVI 525807  526880  1   protein_coding
The columns of the genes.txt file correspond to the following Ensembl database columns:
ensembl_gene_idexternal_gene_idchromosome_namestart_positionend_positionstrandgene_biotype
And there is a header line providing labels for the columns. Example (from the pre-built yeast jar):
$ head yeast/ivals/genes.txt
ensembl_gene_id external_gene_id    chromosome_name start_position\
    end_position    strand  gene_biotype
YHR055C CUP1-2  VIII    214535  214720  -1  protein_coding
YPR161C SGV1    XVI 864445  866418  -1  protein_coding
YOL138C YOL138C XV  61325   65350   -1  protein_coding
YDR395W SXM1    IV  1263316 1266150 1   protein_coding
YGR129W SYF2    VII 750405  751052  1   protein_coding
YPR165W RHO1    XVI 875364  875993  1   protein_coding
YPR098C YPR098C XVI 728945  729526  -1  protein_coding
YPL015C HST2    XVI 525807  526880  -1  protein_coding
YCL050C APA1    III 37836   38801   -1  protein_coding
Using a pre-built reference jar
The Myrna web site lists pre-built reference jars in the right-hand sidebar, including for human, mouse, rat, chimpanzee, and rhesus macaque genomes. All use Ensembl gene annotations. To use one of these reference jars:
- If running in EMR from the command line: make a note of the desired jar's S3 URL (starting with
s3://) and specify that URL using the--referenceoption when running Myrna. - If running in Hadoop mode: download the desired jars using a tool like s3cmd (in which case, use the
s3://URL) orwget(in which case, use thehttp://URL). Be sure to download all three
Building a reference jar using automatic scripts
The Myrna package contains the set of scripts that were used to generate pre-built indexes available from the Myrna web site. The scripts are named $MYRNA_HOME/reftools/*_ensembl.sh. The scripts automatically obtain reference sequecnes from Ensembl, build a Bowtie index using the bowtie-build tool, and build the corresponding set of gene footprint definitions using the reftools/Ensembl.pl and reftools/Ensembl.R scripts also included in the Myrna package.
At the time of this writing, the scripts in the $MYRNA_HOME/reftools directory will only work if the current version of Ensembl is v67. If the Ensembl version changes, the user must edit the ENSEMBL_VER and ENSEMBL_PREFIX variables (at the top of the script) accordingly. This will be fixed in a future version.
Monitoring, debugging and logging
Single computer
Single-computer runs of Myrna are relatively easy to monitor and debug. Progress messages are printed to the console as the job runs. When there is a fatal error, Myrna usually indicates exactly which log file on the local filesystem contains the relevant error message. Additional debugging is possible when intermediate and temporary files are kept rather than discarded; see --keep-intermediates and --keep-all. All output and logs are stored on the local filesystem; see --intermediate and --output options.
Hadoop
The simplest way to monitor Myrna Hadoop jobs is via the Hadoop JobTracker. The JobTracker is a web server that provides a point-and-click interface for monitoring jobs and reading output and other log files generated by those jobs, including after they've finished.
When a job fails, you can often find the relevant error message by "drilling down" from the "step" level through the "job" level and "task" levels, and finally to the "attempt" level. To diagnose why an attempt failed, click through to the "stderr" ("standard error") log and scan for the relevant error message.
See your version of Hadoop's documentation for details on how to use the web interface. Amazon has a brief document describing How to Use the Hadoop User Interface, though some of the instructions are specific to clusters rented from Amazon. Hadoop, the Definitive Guide is also an excellent reference.
EMR
The recommended way to monitor EMR Hadoop jobs is via the AWS Console. The AWS Console allows you to see:
- The status for job (e.g. "COMPLETED", "RUNNING" or "FAILED")
- The status for each step of each job
- How long a job has been running for and how many "compute units" have been utilized so far.
- The exact Hadoop commands used to initiate each job step.
- The button for Debugging Job Flows
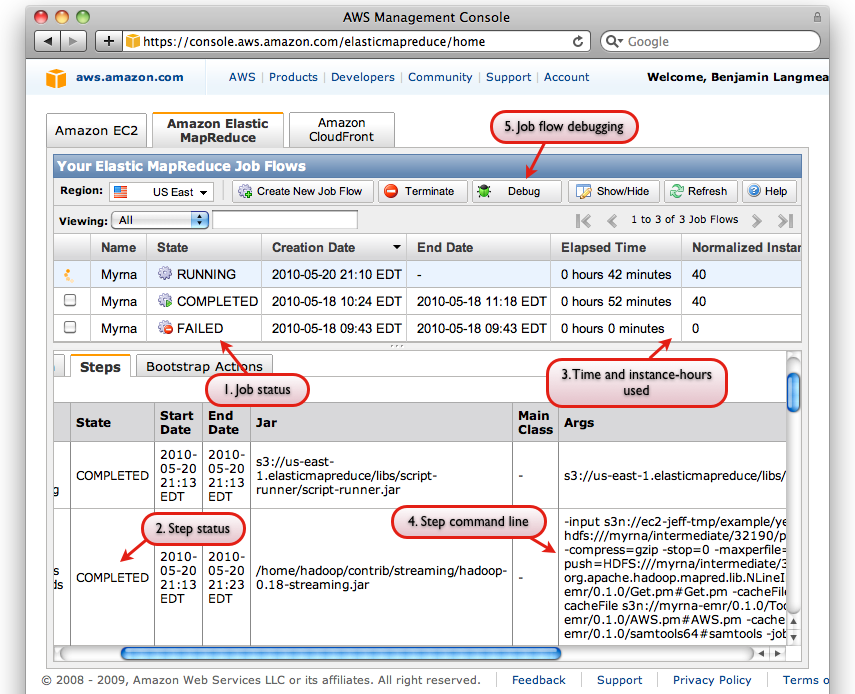
Screen shot of AWS Console interface with some relevant interface elements labeled
The AWS Console also has a useful facility for Debugging Job Flows, which is accessible via the "Debug" button on the "Elastic MapReduce" tab of the Console (labeled "5"). You must (a) have a SimpleDB account (b) not have specified --no-emr-debug in order to use all of the EMR Debug interface's features:
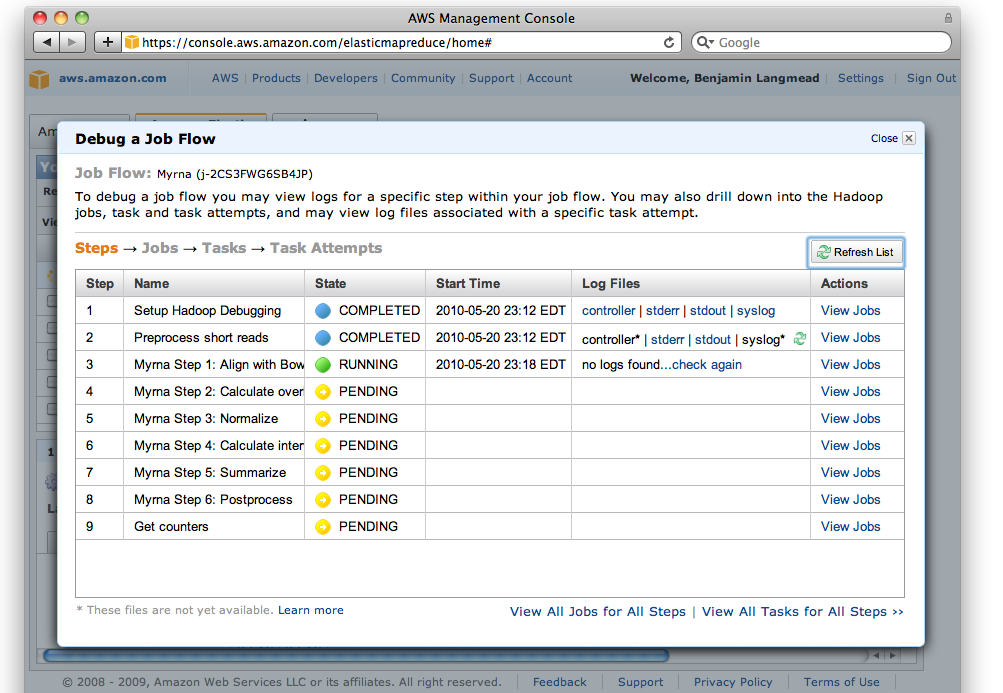
Screen shot of EMR Debug interface
The debug interface is similar to Hadoop's JobTracker interface. When a job fails, you can often find the relevant error message by "drilling down" from the "job" level, through the "task" level, and finally to the "attempt" level. To diagnose why an attempt failed, click through to the "stderr" ("standard error") log and scan for the relevant error message.
For more information, see Amazon's document on Debugging Job Flows.
AWS Management Console
A simple way to monitor your EMR activity is via the AWS Console. The AWS Console summarizes current information regarding all your running EC2 nodes and EMR jobs. Each job is listed in the "Amazon Elastic MapReduce" tab of the console, whereas individual EC2 nodes are listed in the "Amazon EC2" tab.

Screen shot of AWS console; note tabs for "Amazon Elastic MapReduce" and "Amazon EC2"
Myrna output
Myrna's output consists of:
- Annotations used
exons.txt: file containing the exon annotations extracted from Ensembl and used by Myrna. The columns areensembl_gene_id,ensembl_transcript_id,ensembl_exon_id,chromosome_name,exon_chrom_start,exon_chrom_end,is_constitutive, andgene_biotype.genes.txt: file containing the gene annotations extracted from Ensembl and used by Myrna. The columns areensembl_gene_id,external_gene_id,chromosome_name,start_position,end_position,strand,gene_biotype.gene_lengths.txt: a table associating gene names (first column) with the total length of all the intervals eligible for overlapping (configured by the user with the--gene-footprintoption).
- Per-gene p-values and q-values
pvals.txt: a table of calculated p-values for all genes in ascending order by p-value. The first line is a header with column labels:ensembl_gene_idandp_value.pval_hist.pdf: a plot showing the histogram of all gene p-values.pval_hist_dense.pdf: similar to 1b. but histogram bins are smaller.pval_scatter.pdf: A smooth scatter plot of p-value (y axis) against logarithm of 1 plus the total gene count for the gene across all samples (x axis). This can be helpful for diagnosing unexpected behavior in the distribution of p-values by revealing whether the behavior tends toward low- or high-count genes.qvals.txt: a table containing the calculated q-values for all genes in ascending order by q-value. The q-value is the false discovery rate analogue of the p-value. The first line is a header with column labels:ensembl_gene_idandq_value.qval_hist.pdf: a plot showing the histogram of all gene q-values.qval_hist_dense.pdf: similar to 1f. but histogram bins are smaller.
- Gene overlap counts, normalization factors, and normalized expression levels
count_table.txt: a table of per-gene overlap counts across all samples (after any user-requested pooling). Rows are labeled with the gene names (ensembl_gene_id) and columns with sample names.rpkm_table.txt: a table of reads per kilobase of exon model per million mapped reads (RPKM) values, as proposed by Mortazavi et al, calculated by taking the raw count, multiplying by 1 billion, and dividing by the length of the gene footprint (which varies based on the--gene-footprintsetting) times the total sample count over all genes. Rows are labeled with the gene names (ensembl_gene_id) and columns with sample names.<SAMPLE>.txt: a series of files containing the gene overlap counts for each sample (<SAMPLE>= the user-assigned sample name). Genes with zero overlaps are omitted. The first line is a header with column labels:gene_idandcount.<SAMPLE>.norms: a set of summary staistics for<SAMPLE>that could be used as normalization factors. The summary statistics include the per-sample total, upper quartile, median, lower quartile, and maximum count. The quartiles and median are taken from the distribution of non-zero gene counts for the sample. The first row of the file contains labels identifying which factor is which (tot,upper_quart,median,lower_quart, andmax).<SAMPLE>.norm: contains a single number, which is the normalization factor used for<SAMPLE>by Myrna. This factor controls for variability due to technical effects, e.g., the number of reads yielded per lane.
- GO terms for genes:
genes_go.txt: a table associating genes with GO terms. A given GO term might be from the Biological Process ontology, the Cellular Component ontology, or the Molecular Function ontology. If a gene is associated with multiple terms, each association is presented on a separate row. If a gene is not associated with any GO terms, the gene name appears on a single line with no GO term printed in the second column. The first line is a header with column labels:ensembl_gene_idandgo_id.
- Per-gene alignments and coverage. These files are generated only for the "top" genes; i.e. those with the
Tlowest p-values whereTis set via--top:alignments/<GENE>.txt: all alignments overlapping gene<GENE>.alignments/<GENE>_replicates.pdf: a coverage plot showing how the overlapping alignments that counted as evidence fell on the gene, where each replicate is shown on a separate row of the plot.alignments/<GENE>_groups.pdf: a coverage plot showing how the overlapping alignments that counted as evidence fell on the gene, where each group is shown on a separate row of the plot. "Group" coverage is simply the combined coverage of all samples in the group.
Other reading
The Crossbow paper discusses the broad design philosophy of both Crossbow and Myrna and why cloud computing can be considered a useful trend for comparative genomics applications. The Bowtie paper discusses the alignment algorithm underlying Bowtie.
For additional information regarding Amazon EC2, S3, EMR, and related services, see Amazon's AWS Documentation. Some helpful screencasts are posted on the AWS Console home page.
For additional information regarding Hadoop, see the Hadoop web site and Cloudera's Getting Started with Hadoop document. Cloudera's training virtual machine for VMWare is an excellent way to get acquainted with Hadoop without having to install it on a production cluster.
Acknowledgements
Myrna is by Ben Langmead, Kasper D. Hansen, and Jeffrey T Leek.
Bowtie is by Ben Langmead and Cole Trapnell.
